

How do i get my child to ride a bike
To get your child riding, start with a bike that fits now, practise balance and braking in a quiet open area, and build confidence in short, pressure-free sessions.
Measure before choosing a bike
Measure your child’s height without shoes, then measure inseam from the floor to the crotch. Height gives you a wheel-size starting point; inseam helps you judge whether the child can stand over the bicycle comfortably. Age is only a rough guide.
Have your child try the actual bicycle. They should be able to get on and off without struggling, hold the handlebar without stretching, and turn it while remaining balanced. Check that their hands can reach and operate the brakes with control. Do not buy an oversized bicycle simply to allow room for growth.
| Wheel size | Starting age | Rider height |
|---|---|---|
| 12 Inch | 3–4 | 34–40 in / 86–102 cm |
| 14 Inch | 3–6 | 37–45 in / 94–114 cm |
| 16 Inch | 4–7 | 40–48 in / 102–122 cm |
| 18 Inch | 5–9 | 43–52 in / 109–132 cm |
| 20 Inch | 7–12 | 48–60 in / 122–152 cm |
| 24 Inch | 10–14 | 54–64 in / 137–163 cm |
| 26 Inch | Youth and adults | Over 60 in / 153 cm |
Where ranges overlap, compare stand-over clearance, reach, brake control and confidence on each candidate. Choose the bike your child controls comfortably today.
Remove the first obstacles
Before asking your child to pedal, find out what is stopping them. A bike that feels too tall, brakes they cannot comfortably reach, fear of falling, or an adult holding and steering unpredictably can all make practice harder. Fix the fit problem first; encouragement cannot compensate for a bicycle the rider cannot control.
Use a flat, traffic-free practice area with plenty of clear space. Dress the child for movement and secure loose clothing or laces. A bicycle helmet should fit properly, sit level, and have its straps adjusted according to the helmet manufacturer’s instructions.
Teach control before continuous pedalling
- Start with mounting and stopping. Let the child practise getting on, placing their feet securely, applying the brakes and getting off.
- Work on balance. Have them move at a manageable pace and focus on looking ahead. Offer light support only if needed, and tell them before you release it.
- Add steering. Use wide, gentle turns around visible markers rather than sharp manoeuvres.
- Introduce pedalling. Once balance and stopping look controlled, help the child position a pedal for a confident first push, then let them attempt a few pedal strokes.
- Combine the skills. Practise starting, riding a short distance, slowing and making a deliberate stop.
Keep each goal small enough to repeat successfully. End a session while the child is still comfortable instead of pushing through fatigue or frustration.
Compare progress, not speed
Watch what the child can do without rescue. Useful signs of readiness for the next step include looking ahead, steering around an obstacle, braking on request, putting a foot down deliberately and restarting without panic. If one skill breaks down repeatedly, return to that skill rather than increasing distance.
A hesitant child may need several balance-only sessions. A confident child may combine the stages quickly. Avoid racing siblings, setting a deadline or removing support without warning. The practical target is independent control, not learning within a particular number of days.
When the supplied bicycle is relevant
The XJD Pink Beach Cruiser for Girls – Rear Rack & V-Brake is a beach cruiser offered with 20 Inch, 24 Inch and 26 Inch SKU labels. It is relevant as a comparison when your child’s measured height points toward one of those starting sizes and they can demonstrate suitable stand-over clearance, reach and brake control on the actual bicycle. Its rear rack and V-brake are catalog features, but neither establishes fit.
These catalog options help you compare three larger wheel-size starting points after measuring your child; they are not substitutes for a 12, 14, 16 or 18 Inch bicycle when one of those sizes fits the rider.

For assembly, adjustment, maintenance, compatibility, load limits and torque requirements, follow the exact product manual or ask a qualified bicycle mechanic. Confirm that the bicycle and brakes operate correctly before every practice session.
Decide what to do next
Measure height and inseam today, shortlist the matching wheel-size starting point, and arrange an individual fit check. If your child can mount, stand over, reach, steer and brake comfortably, begin with stopping and balance in a clear area. If they cannot, change the bicycle or its fit before asking them to ride.
Bikes for your next adventure
-
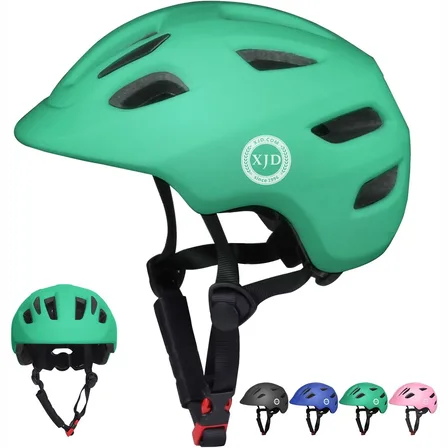
Green XJD Toddler Bike Helmet with Adjustable Fit, XS (46–51 cm)
The XJD toddler bike helmet in Green is built for the youngest riders — the size…$20.39
$23.99 -

Kids Bike Helmet by XJD for Boys & Girls – Black, Blue, Green, Pink, Purple
The XJD Kids Bike Helmet covers a wide 2-to-8-year age range thanks to two head-…$59.99
-

Kids Bike Helmet by XJD for Girls – Pink
The XJD Kids Bike Helmet in Pink is a lightweight multi-sport helmet for girls r…$59.99
$99