

When we were kids bikes in the yard
When we were kids, bikes in the yard meant freedom close to home. Recreate that experience by choosing a bike that fits now, preparing a clear practice area, and supervising each ride.
Start with the child, not the age label
Measure the rider’s height without shoes, then check inseam, reach, brake control and current confidence on the actual bicycle. Age is only a starting point. A child should be able to stand over the bike, reach the controls comfortably and steer without stretching or losing balance.
Have the child try the bicycle before deciding. Do not buy an oversized model merely to leave room for growth: extra size can make starting, stopping and turning harder to control. If the rider cannot operate the brakes confidently or appears cramped or extended, compare another size or model.
Compare the relevant wheel-size starting points
| Wheel size | Starting age | Rider height |
|---|---|---|
| 12 Inch | 3–4 | 34–40 in / 86–102 cm |
| 14 Inch | 3–6 | 37–45 in / 94–114 cm |
| 16 Inch | 4–7 | 40–48 in / 102–122 cm |
| 18 Inch | 5–9 | 43–52 in / 109–132 cm |
| 20 Inch | 7–12 | 48–60 in / 122–152 cm |
| 24 Inch | 10–14 | 54–64 in / 137–163 cm |
| 26 Inch | Youth and adults | Over 60 in / 153 cm |
These ranges overlap because children with similar heights can have different proportions and skill levels. Use measured height to identify candidates, then confirm stand-over clearance, reach, brake access and control. Never treat the table as permission to skip an individual fit check.
What to check before riding in the yard
- Define the route: choose a clear loop or short straight run with enough space to start, turn and stop without entering a driveway or street.
- Remove hazards: look for toys, hoses, branches, holes, loose gravel, vehicles, steps and low obstacles.
- Set boundaries: show the child exactly where to stop and which areas are out of bounds.
- Check the bicycle: follow the exact product manual for assembly and maintenance. If anything is loose, damaged, unclear or beyond the manual, use a qualified bicycle mechanic.
- Fit the helmet: use a bicycle helmet that fits properly, sits level and has straps adjusted according to its manufacturer’s instructions.
A grassy yard may feel forgiving, but soft or uneven ground can also make steering and pedaling more difficult. Match the practice area to the child’s present ability and stay close enough to intervene.
How the supplied bikes fit this decision
The two catalog options are training-wheel bikes spanning different listed wheel sizes. They help a family compare 12-, 14- and 16-inch choices directly, while one also adds a 20-inch option. Their relevance still depends on the rider’s measurements and an actual control check.
 XJD Kids' Training Wheel Bike for Boys & Girls, 12/14/16 Inch – White
A Training Wheel Bikes option with supplied 12 Inch, 14 Inch and 16 Inch labels, relevant when the rider’s measurements and individual control check point to one of those sizes.
 Girls' Training Wheel Bike by XJD, 12–20 Inch Wheels – Blue
A Training Wheel Bikes option with supplied 12 Inch, 14 Inch, 16 Inch and 20 Inch labels; useful for comparison only after confirming the rider’s height, reach, stand-over and brake control.
Shared and different size choices
XJD Kids' Training Wheel Bike for Boys & Girls, 12/14/16 Inch – White is listed in Training Wheel Bikes and offers 12 Inch, 14 Inch and 16 Inch SKU labels.
Girls' Training Wheel Bike by XJD, 12–20 Inch Wheels – Blue is also listed in Training Wheel Bikes and offers 12 Inch, 14 Inch, 16 Inch and 20 Inch SKU labels.
For a child whose fit check points toward 12, 14 or 16 inches, both products provide a same-size catalog comparison. If the fit check points toward 20 inches, only the blue XJD listing includes that supplied size. Neither product has a supplied 18-, 24- or 26-inch SKU label, so these products are not substitutes when one of those sizes fits the rider.
When training wheels are relevant
These products are relevant when the family specifically wants to compare catalog options in the Training Wheel Bikes category and the rider fits one of their listed sizes. Training wheels do not override fit: the child must still reach the controls, stand over the bicycle appropriately and manage steering and braking.
They are less relevant when the child’s measurements indicate an unlisted wheel size, when the rider is already confident on a different setup, or when an individual trial reveals poor reach or control. For training-wheel adjustment, compatibility, assembly, load limits or torque, consult the exact product manual or a qualified bicycle mechanic.
Make the yard session progressive
Begin with the child practicing starts and deliberate stops inside the marked boundary. Add wide turns only after stopping is consistent; then introduce a simple loop if the space remains clear. Keep the first sessions short enough that fatigue does not erode attention or control.
Before bringing back that familiar “bikes in the yard” feeling, measure the child, shortlist only the matching wheel sizes, confirm fit on the actual bike, clear the route and practice one controlled start-and-stop sequence together.
Bikes for your next adventure
-
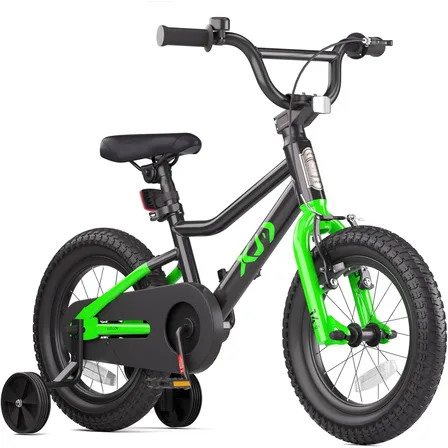
Black XJD Kids' BMX Bicycle with Training Wheels
The XJD Kids' BMX Bicycle with Training Wheels is built for children roughly 3 t…$99.99
$119.99 -

Kids Bike Helmet by XJD for Boys & Girls – Black, Blue, Green, Pink, Purple
The XJD Kids Bike Helmet covers a wide 2-to-8-year age range thanks to two head-…$59.99
-

Kids Bike Helmet by XJD for Girls – Pink
The XJD Kids Bike Helmet in Pink is a lightweight multi-sport helmet for girls r…$59.99
$99