

How Do You Carry a Girl's Bike on a Bike Rack?
Carry a girl's bike only on a rack that matches its frame or wheels and can support its measured weight. Check the bike and rack dimensions before loading.
Measure the bike before choosing a rack position
“Girl's bike” does not identify one frame shape or rack fit. Record the bicycle's total weight as it will be transported, including training wheels and any attached accessories. Then measure the wheelbase from axle to axle, tire width, wheel diameter, and the size and shape of any frame tube a rack arm or clamp would contact.
Compare those measurements with the rack manufacturer's stated per-bike capacity, total capacity, wheelbase range, tire-width range, frame-contact rules and permitted wheel sizes. Also confirm that the rack itself is approved for the vehicle, hitch or mounting system being used. If any limit or compatibility detail is missing, consult the exact rack manual or its manufacturer rather than estimating.
Choose the correct type of support
A platform rack supports a bike at its wheels, but its trays, wheel cups and securing arms must fit the child's shorter wheelbase and smaller wheels. Verify that training wheels do not collide with the tray, rack structure, vehicle or another bicycle.
A hanging rack supports a bicycle by its frame. A low, curved or sloping top tube may prevent the bike from sitting level or engaging both support arms as intended. Use a compatible frame adapter only when the rack and adapter manufacturers explicitly permit that combination. Do not improvise with a loose bar, rope or unsupported clamp.
For trunk-mounted racks, confirm the rack's vehicle fit and bicycle-position rules. The small bike must sit fully within its supports without contacting the vehicle, road, exhaust or moving parts.
Load and secure the bike methodically
- Park on a level surface, switch off the vehicle and unfold or install the rack exactly as its manual directs.
- Remove only loose accessories that their instructions allow you to remove. Never make an unapproved change to the bike or training-wheel assembly merely to force a fit.
- Place the bicycle in the approved position without exceeding any individual or total load limit.
- Attach every required wheel strap, frame cradle, hook or clamp at the manufacturer's specified contact point. Keep straps away from spokes, brake controls and other moving parts.
- Check clearance around the vehicle, adjacent bikes, pedals, handlebars and training wheels. Nothing should swing into the bodywork or another bicycle.
- Perform the rack maker's required final checks, then recheck the installation at the intervals stated in the manual.
If the bicycle cannot engage all required restraints, sits outside the supported dimensions, or has uncertain clearance, do not transport it on that rack. Use another compatible system or ask a qualified bicycle mechanic or rack specialist to inspect the combination.
How the supplied girls' bike helps with comparison
The XJD Girls Bike for Kids Ages 3-8, 12/14/16 Inch with Training Wheels – Purple is offered in 12 Inch, 14 Inch and 16 Inch catalog options. Those sizes and the supplied training wheels make it relevant when checking whether a rack accommodates small wheels, a short child-bike layout and extra side clearance. The age wording is part of the product title, not proof that the bicycle fits a particular child or rack; no weight, wheelbase or rack compatibility is supplied, so measure the actual configured bicycle.

Do not confuse wheel size with rack compatibility
Wheel size is a useful starting point, but it does not reveal weight, tire width, wheelbase, frame-contact suitability or training-wheel clearance. The XBikes fit starting points below concern the rider, not the rack:
| Wheel size | Starting age | Starting rider height |
|---|---|---|
| 12 Inch | 3–4 | 34–40 in / 86–102 cm |
| 14 Inch | 3–6 | 37–45 in / 94–114 cm |
| 16 Inch | 4–7 | 40–48 in / 102–122 cm |
| 18 Inch | 5–9 | 43–52 in / 109–132 cm |
| 20 Inch | 7–12 | 48–60 in / 122–152 cm |
| 24 Inch | 10–14 | 54–64 in / 137–163 cm |
| 26 Inch | Youth and adults over 60 in | Over 60 in / 153 cm |
For rider fit, prioritize measured height, inseam, reach, brake control and current confidence over age. Have the child try the bicycle, check stand-over and control, and do not buy an oversized bike solely for growth.
Make the final go-or-no-go decision
Before driving, answer four questions: Is the measured bike within every rack limit? Does its frame or wheel geometry engage each required support? Are the training wheels and other parts clear? Is the rack approved for the vehicle and installed exactly as directed? If any answer is no or unknown, stop and resolve it through the manuals, manufacturer or a qualified mechanic.
After unloading, check the bicycle before the child rides. The child's helmet should fit properly, sit level and have its straps adjusted according to the helmet manufacturer's instructions. The practical decision is simple: transport this girl's bike only when its real measurements—not its label or appearance—match the rack's documented requirements.
Bikes for your next adventure
-

XJD Kids Bike for Girls – Pink, 12/14/16/20 Inch with Training Wheels
The XJD Kids Bike for Girls in Pink is a training-wheel bike built to carry your…$139
$159 -

XJD Boys 12/14/16" Training Wheel Bike – Blue
The XJD Boys Bike in Blue is a training wheel bike for riders 71–122 cm tall—rou…$169
$199 -
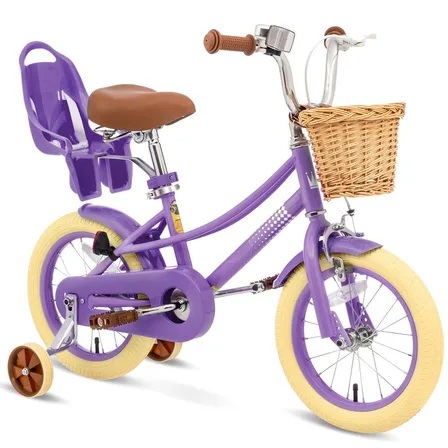
XJD Girls' Bike with Training Wheels, 12/14/16/20 Inch – Purple
The XJD girls' bike with training wheels in Purple is built to grow with your ri…$139
$159