

How to carry two kids on bike
To carry two kids on a bike, use a bicycle or trailer specifically designed for two child passengers, then verify each seat, restraint, attachment and load limit in the exact manuals. A standard children’s bike is not a two-passenger carrier.
Choose the carrying arrangement first
Start by deciding whether both children will be passengers or whether one or both can ride independently. For two passengers, compare purpose-built arrangements such as a two-child trailer or a cargo bicycle configured with two approved child positions. Do not improvise seats on handlebars, a frame or a rack that the manufacturer has not approved for that use.
Check the bicycle, carrier, seat and attachment manuals as one system. Their compatibility requirements and limits must all allow the proposed arrangement. If a limit, attachment point or assembly step is missing or unclear, have a qualified bicycle mechanic inspect the complete setup before carrying either child.
Measure both children and the complete load
Record each child’s current height and inseam. If they will be passengers, also obtain the measurements and load information required by the carrier manual; do not estimate missing limits. Include everything the manual defines as load, which may extend beyond the children themselves.
- For each child: record current height, inseam and any manual-required passenger measurement.
- For the system: compare the bicycle, carrier, seat, restraint and attachment requirements.
- For the adult rider: confirm comfortable reach, controlled starts and stops, brake operation and the ability to steady the loaded bike.
The lowest applicable limit or most restrictive compatibility rule governs the setup. Never assume that space for two children proves that the bicycle is approved to carry them.
Check the fit and control of every rider
If one child will ride independently, choose wheel size from measured height as a starting point, then check the actual bicycle. The child should try it rather than receiving an oversized bike for future growth. Check stand-over clearance, reach, brake control and current confidence.
| Wheel size | Starting age | Rider height |
|---|---|---|
| 12 Inch | 3–4 | 34–40 in / 86–102 cm |
| 14 Inch | 3–6 | 37–45 in / 94–114 cm |
| 16 Inch | 4–7 | 40–48 in / 102–122 cm |
| 18 Inch | 5–9 | 43–52 in / 109–132 cm |
| 20 Inch | 7–12 | 48–60 in / 122–152 cm |
| 24 Inch | 10–14 | 54–64 in / 137–163 cm |
| 26 Inch | Youth and adults | Over 60 in / 153 cm |
Age is secondary to measured height and the individual fit check. Overlapping ranges are comparison points, not permission to choose either size without trying the bike.
When the supplied bike is relevant
The XJD Girls' Bike with Training Wheels, 12/14/16/20 Inch – Purple is offered in 12 Inch, 14 Inch, 16 Inch and 20 Inch catalog options. It is relevant when one of the children may ride a separate bike and those sizes provide useful fit-check starting points. The supplied facts do not identify it as equipment for carrying passengers, so it should not be treated as a two-child transport solution.
These catalog options help compare an independently riding child’s measured height with four available wheel sizes while keeping the actual stand-over, reach, brake control and confidence checks central.

For this product, the XBikes starting ranges are 34–40 inches for 12 Inch, 37–45 inches for 14 Inch, 40–48 inches for 16 Inch and 48–60 inches for 20 Inch. The listed age ranges are only starting points. Follow the exact product manual or consult a qualified bicycle mechanic for assembly, maintenance and any compatibility question not answered by the supplied facts.
Perform a stationary check before moving
Install and adjust every component exactly as its manufacturer directs. With the bike stationary, verify that both passenger positions, restraints and attachments match their manuals. Confirm that nothing interferes with steering, wheels, pedaling or brake operation. Use a qualified bicycle mechanic if the instructions conflict or the bicycle becomes difficult to control.
Each rider must have a properly fitting bicycle helmet. The helmet should sit level, and its straps should be adjusted and used according to the helmet manufacturer’s instructions. Recheck helmet fit for both children rather than assuming that two helmets labeled alike fit alike.
Make the final two-child decision
- Decide who will be a passenger and who, if anyone, will ride independently.
- Measure both children and compare the relevant manuals and fit ranges.
- Reject any carrying setup that lacks explicit two-passenger compatibility or a clear applicable limit.
- Complete a stationary control and helmet check; ask a qualified mechanic about any uncertainty.
Choose the two-child carrying system only after every component approves the same arrangement. If a child will ride separately, use the wheel-size table to shortlist a size, then complete an individual fit and control check before riding together.
Bikes for your next adventure
-

XJD Kids Bike for Girls – Pink, 12/14/16/20 Inch with Training Wheels
The XJD Kids Bike for Girls in Pink is a training-wheel bike built to carry your…$139
$159 -

XJD Boys 12/14/16" Training Wheel Bike – Blue
The XJD Boys Bike in Blue is a training wheel bike for riders 71–122 cm tall—rou…$169
$199 -
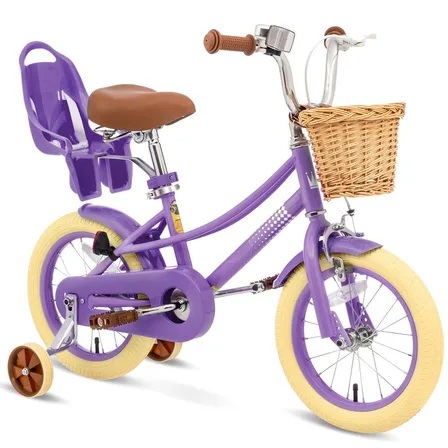
XJD Girls' Bike with Training Wheels, 12/14/16/20 Inch – Purple
The XJD girls' bike with training wheels in Purple is built to grow with your ri…$139
$159