

How to pick a bicycle for a child
Pick a child’s bicycle by measuring height and inseam, choosing a wheel-size starting point, then checking stand-over, reach, brakes and control in person.
Measure the rider before comparing bicycles
Measure the child without shoes, standing straight against a wall, for an accurate current height. Then measure the inseam from the floor to the crotch. Record both measurements rather than relying on clothing size, school year or a recent growth estimate.
Height identifies a sensible wheel-size range. Inseam helps you judge whether the child can stand over the bicycle comfortably and put their feet down as needed. Neither measurement proves that a particular frame fits, because bicycles with the same wheel size can differ in shape and riding position.
Do not deliberately choose an oversized bicycle to allow for growth. A bicycle that is difficult to mount, reach or stop can undermine control now. The useful size is the one the child can manage confidently today.
Use wheel size as the first filter
Compare the measured height with these XBikes starting points. Age can help narrow the search, but measured height takes priority where the two indicators disagree.
| Wheel size | Age starting point | Rider-height starting point |
|---|---|---|
| 12 Inch | Ages 3–4 | 34–40 in / 86–102 cm |
| 14 Inch | Ages 3–6 | 37–45 in / 94–114 cm |
| 16 Inch | Ages 4–7 | 40–48 in / 102–122 cm |
| 18 Inch | Ages 5–9 | 43–52 in / 109–132 cm |
| 20 Inch | Ages 7–12 | 48–60 in / 122–152 cm |
| 24 Inch | Ages 10–14 | 54–64 in / 137–163 cm |
| 26 Inch | Youth and adults | Over 60 in / 153 cm |
The ranges overlap intentionally. When a child falls into more than one row, compare candidate bicycles through an individual fit check instead of automatically selecting the larger wheels. Current confidence matters too: a hesitant beginner may control one candidate more naturally than another even when both correspond to the height table.
Check fit and control with the child on the bicycle
Have the child try the bicycle. A useful check covers the complete riding task, not merely whether they can sit on the saddle.
- Stand-over: The child should be able to straddle the bicycle without the frame obstructing a comfortable stance.
- Reach: They should hold the handlebars without stretching, locking their arms or losing a stable riding position.
- Brake access: Confirm that they can reach and operate the bicycle’s braking controls effectively. Do not assume small hands can manage every control.
- Starting and stopping: Ask them to demonstrate a controlled start, straight ride, turn and stop in a suitable traffic-free area.
- Confidence: Watch for steady steering and deliberate movements rather than accepting a fit that the child finds intimidating.
If stand-over, reach or brake control is poor, try a different bicycle or size. Saddle adjustment alone cannot make every mismatched frame appropriate. For assembly, adjustment limits, compatibility, torque and maintenance procedures, follow the exact product manual or use a qualified bicycle mechanic.
When the supplied catalog option is relevant
The Light Pink XJD Girls' Bicycle with Basket & Training Wheels is listed under Training Wheel Bikes and has 12 Inch, 14 Inch, 16 Inch and 20 Inch SKU labels. That span makes it useful for comparing several wheel-size starting points when a family specifically wants a training-wheel bicycle with the named basket. The catalog options below help connect those four labels to the measurements and hands-on checks above.

This product is relevant only when one of its available wheel-size labels matches the rider’s measured-height starting point and the individual bicycle passes the fit check. It may not be relevant for a rider whose measurements point toward 18 Inch, 24 Inch or 26 Inch, because those labels are not supplied for this product. It is also not the automatic choice for a child who does not need or want a training-wheel bike.
The title’s word “Girls'” is part of the exact catalog name, not evidence of fit. Choose according to the individual rider’s measurements, reach, control, confidence and preferences—not the gender wording in a product title.
Complete the safety and purchase check
Pair the bicycle decision with a properly fitting bicycle helmet. It should sit level and its straps should be used according to the helmet manufacturer’s instructions. Recheck helmet fit rather than assuming an older helmet still fits.
- Write down the child’s current height and inseam.
- Use the XBikes table to shortlist wheel sizes, prioritizing height over age.
- Have the child try each candidate and compare stand-over, reach, brake operation, starting, turning and stopping.
- Reject any bicycle that requires the child to stretch, struggle with the brakes or sacrifice present control merely to leave room for growth.
- Before riding, follow the bicycle’s exact manual for assembly and maintenance, or ask a qualified bicycle mechanic.
Make the final choice only after the child demonstrates comfortable control of the correctly assembled bicycle; if the fit is uncertain, measure again and try another size.
Bikes for your next adventure
-
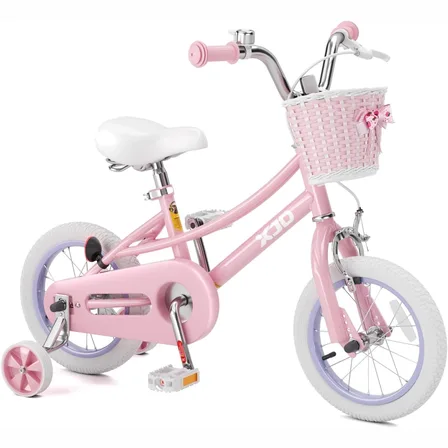
Pink 12/14/16/20" XJD Girls Bike with Training Wheels & Basket
The Pink XJD Girls Bike with Training Wheels & Basket is a first-bike pick f…$65.99
$75.99 -

Light Pink XJD Girls' Bicycle with Basket & Training Wheels
The Light Pink XJD Girls' Bicycle with Basket & Training Wheels is a retro-style…$109.99
$129.99 -

Black XJD Kids Bike for Boys – 12, 14 & 16 Inch Sizes
For a son between roughly 3 and 8 years old, the XJD Kids Bike in Black covers t…$169
$199