

What size bike for 48 inch tall child
A 48-inch-tall child should compare 16-, 18-, and 20-inch bikes in person. Height sits exactly where the XBikes ranges overlap, so inseam, reach, brake control, and confidence must decide the fit.
Which wheel size should you try first?
At 48 inches (122 cm), there is no single automatic wheel size. A 16-inch bike reaches the upper edge of its height range, an 18-inch bike falls within its range, and a 20-inch bike begins at this height. Treat all three as fitting-room candidates, not interchangeable choices.
| Wheel size | XBikes starting range | What 48 inches means |
|---|---|---|
| 16 Inch | Ages 4–7; 40–48 in / 102–122 cm | Top edge of the height range |
| 18 Inch | Ages 5–9; 43–52 in / 109–132 cm | Within the height range |
| 20 Inch | Ages 7–12; 48–60 in / 122–152 cm | Bottom edge of the height range |
Measured height matters more than age. The age bands are only starting points, while children of the same height can have different leg lengths, arm reach, coordination, and riding experience.
Measure height and inseam before shopping
Measure the child without shoes, standing straight against a wall. Record the floor-to-top-of-head height rather than relying on an older measurement or an estimate.
Next, measure inseam. Have the child stand with feet naturally spaced, then measure from the floor to the crotch. Use that measurement when checking the stand-over space and saddle adjustment on the exact bicycle. Wheel size alone cannot reveal whether a particular frame will fit.
Bring both measurements to the fit check. Do not assume that every 16-inch or every 20-inch model has identical frame proportions.
How to compare the three candidates
Have the child try each plausible bike. While standing over the frame, the child should be able to manage the bicycle without being forced into an awkward position. When seated, they should reach the handlebar naturally, steer without stretching, and remain balanced rather than leaning forward to find the controls.
If the bicycle has hand-brake levers, confirm that the child can reach and operate them with control while maintaining a secure grip. Also watch a careful start, stop, turn, and dismount in an appropriate supervised area.
- Choose the 16-inch candidate only if it still provides a comfortable individual fit and does not feel cramped.
- Consider the 18-inch candidate when its frame gives suitable stand-over, reach, and control.
- Choose the 20-inch candidate only if the child can confidently control it now—not because it leaves more room for growth.
Why the supplied catalog option is relevant
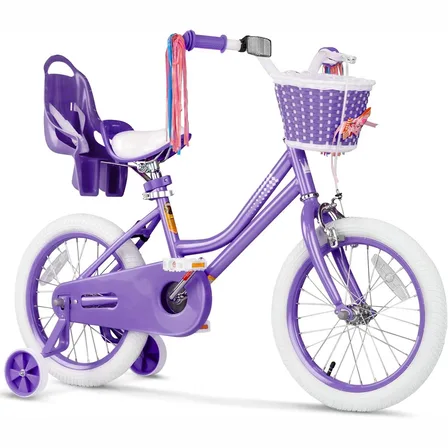
The XJD Girls' Bike with Training Wheels, 12/14/16/20 Inch – Purple is relevant because its supplied size labels include both 16 Inch and 20 Inch, the two boundary sizes for a child measuring 48 inches. Its 12 Inch and 14 Inch labels fall below the XBikes height starting points for this rider, while the catalog does not list an 18 Inch option. The displayed sizes therefore help compare the boundary choices, but they do not eliminate the need to try an 18-inch bike or perform an individual fit check.

This product is categorized as a training-wheel bike. Training wheels may relate to a child's current riding confidence, but they do not make an oversized or poorly fitting bicycle appropriate. Use height, inseam, reach, control, and the exact frame fit first.
Do not size up just for growth
An oversized bicycle can make starting, stopping, steering, and dismounting harder. The verified pediatric guidance is to have the child try the bicycle rather than buying one that is too large in anticipation of growth. If a 20-inch model compromises stand-over, reach, or control, move down and compare the properly fitting alternatives.
Conversely, do not automatically choose 16 inches merely because the child is still inside that range. At its upper boundary, the fit may already feel cramped on a particular frame. This is why the 18-inch range deserves consideration even though the supplied product does not offer that label.
What to do before the first ride
- Confirm the child's current height and inseam.
- Try 16-, 18-, and 20-inch candidates that suit those measurements.
- Compare stand-over position, handlebar reach, steering, brake operation where applicable, and the child's present confidence.
- Follow the exact product manual for assembly, adjustment, maintenance, load limits, compatibility, and torque. If anything is unclear, use a qualified bicycle mechanic.
- Fit a bicycle helmet properly. It should sit level, with its straps used according to the helmet manufacturer's instructions.
For a child who is exactly 48 inches tall, buy the size they can comfortably stand over, reach, brake, steer, and stop today—even if that means rejecting the larger option.
Bikes for your next adventure
-
XJD Girls Bike for Kids Ages 3-8, 12/14/16 Inch with Training Wheels – Purple
The XJD Girls Bike in Purple is a training-wheel bicycle for kids ages 3 to 8, f…$149
$169 -

XJD Kids Bike for Girls – Pink, 12/14/16/20 Inch with Training Wheels
The XJD Kids Bike for Girls in Pink is a training-wheel bike built to carry your…$139
$159 -

Black XJD Kids Bike for Boys – 12, 14 & 16 Inch Sizes
For a son between roughly 3 and 8 years old, the XJD Kids Bike in Black covers t…$169
$199