

How to carry a toddler on a bike
To carry a toddler on a bike, choose a child-carrying system that fits your bicycle and child, confirm every limit in its manual, and practise before riding in traffic.
Choose how the toddler will ride
The usual choices are a bicycle-mounted child seat, a cycle trailer, or a cargo bike designed to carry children. Start with the system, not an improvised rack, basket, doll seat or adult’s arms. The bicycle and carrier must be explicitly compatible, and the child must meet the carrier manufacturer’s requirements.
A mounted seat keeps the child close but changes the bicycle’s balance, especially while mounting, stopping and parking. A trailer places the child lower and adds width and length. A purpose-built cargo bike may carry children in a dedicated compartment, but its restraints, seating configuration and limits remain model-specific. Compare these handling differences with your route, storage space and ability to steady the loaded bicycle.
Measure and compare before buying
Write down the toddler’s current height and weight, then compare both with the carrier manual. Also note whether the child can maintain the posture and head control required by that manufacturer. Do not guess readiness from age alone.
For the adult bicycle, identify its exact model and measure or verify the frame size, wheel size, rack dimensions if applicable, and the available mounting space. Check for interference with the saddle, pedals, steering, brakes, cables and wheels. Confirm these points against both manuals:
- The carrier’s child-size and load limits.
- The bicycle’s permitted loads and approved mounting locations.
- Whether a compatible rack or adapter is required.
- Whether the toddler’s feet, hands and clothing are fully separated from moving parts.
- Whether the restraint and foot-retention system adjusts securely to the child.
If a limit, attachment method, compatibility detail or torque value is unclear, do not improvise. Ask the manufacturer or have a qualified bicycle mechanic inspect and install the system.
Check the helmet and seating fit
The toddler needs a bicycle helmet that fits properly, sits level and has straps adjusted according to the helmet manufacturer’s instructions. Check the fit with the child seated in the actual carrier: the helmet must not be pushed forward by a high seat back or otherwise prevent a natural head position.
Buckle the carrier restraint exactly as its manual directs. Remove or secure loose scarves, straps and clothing. Before every trip, confirm that the mounting hardware is secure, the restraint remains correctly adjusted and nothing can reach a wheel or drivetrain.
Test the loaded bicycle away from traffic
First test the empty carrier, then repeat with the toddler only when the setup has passed its compatibility and installation checks. Use a quiet, level place. Practise holding the bicycle upright, mounting, starting, steering, braking, stopping and parking. A loaded bicycle may respond differently and require more deliberate balance and braking.
Plan a short first ride on a low-stress route. Avoid situations that exceed the bicycle or carrier instructions, and reassess if the toddler becomes uncomfortable or the bicycle feels difficult to control. Never leave a child unattended in a carrier, including while the bicycle is parked.
What the supplied XBikes products are for
The supplied catalog options help clarify an important distinction: they are training-wheel bicycles for a child who is learning to ride, not verified toddler-carrying systems. Their basket or doll-seat wording does not establish a place for transporting a child. They are relevant only if you are comparing a future independently ridden bike, not solving how to carry a toddler today.
 Pink Girls' 12/14/16" Bike by XJD – Basket & Doll Seat
A training-wheel bicycle offered in 12 Inch, 14 Inch and 16 Inch sizes. It may be compared for independent riding; its catalog-listed doll seat is not evidence of suitability for carrying a toddler.
 Pink 12/14/16/20" XJD Girls Bike with Training Wheels & Basket
A training-wheel bicycle available in 12 Inch, 14 Inch, 16 Inch and 20 Inch sizes. It is relevant to independent-rider sizing, while the supplied basket fact does not establish passenger-carrying compatibility.
Pink Girls' 12/14/16" Bike by XJD – Basket & Doll Seat is listed in Training Wheel Bikes with 12 Inch, 14 Inch and 16 Inch choices. The doll seat named in the title must not be treated as a toddler passenger seat.
Pink 12/14/16/20" XJD Girls Bike with Training Wheels & Basket is also listed in Training Wheel Bikes, with 12 Inch, 14 Inch, 16 Inch and 20 Inch choices. Its basket likewise provides no supplied evidence of child-carrying suitability.
If your toddler is ready to ride independently
Only use these wheel-size starting points when selecting a bicycle for the child to ride: 12 Inch corresponds to 34–40 in (86–102 cm) and ages 3–4; 14 Inch to 37–45 in (94–114 cm) and ages 3–6; 16 Inch to 40–48 in (102–122 cm) and ages 4–7; and 20 Inch to 48–60 in (122–152 cm) and ages 7–12.
Measure the child’s height and inseam, then have the child try the bicycle. Check stand-over clearance, reach, brake control and confidence. Prioritize those observations over age, and do not buy an oversized bicycle merely for growth. The two catalog products offer overlapping comparison sizes, but neither becomes a passenger carrier because it fits the child as a rider.
Make the decision
If the toddler will be a passenger, compare a genuine child seat, trailer or child-carrying cargo bike against the child’s measurements, your exact bicycle and both manuals; use a mechanic when compatibility is uncertain. If the child will pedal independently, measure and perform the individual fit check before choosing among the listed wheel sizes.
Bikes for your next adventure
-

XJD Kids Bike for Girls – Pink, 12/14/16/20 Inch with Training Wheels
The XJD Kids Bike for Girls in Pink is a training-wheel bike built to carry your…$139
$159 -

XJD Boys 12/14/16" Training Wheel Bike – Blue
The XJD Boys Bike in Blue is a training wheel bike for riders 71–122 cm tall—rou…$169
$199 -
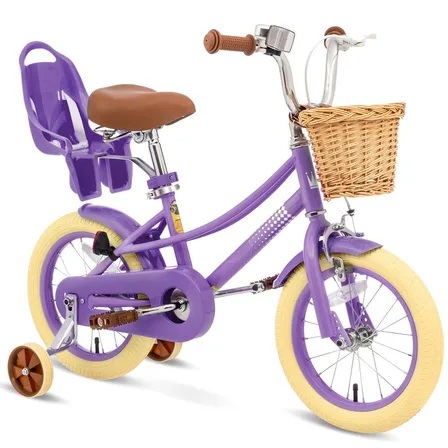
XJD Girls' Bike with Training Wheels, 12/14/16/20 Inch – Purple
The XJD girls' bike with training wheels in Purple is built to grow with your ri…$139
$159