

How to pick a bike for your child
Pick a child’s bike by measuring height and inseam, then checking stand-over clearance, reach, brake control and confidence on the actual bike. Age is only a starting point, and buying oversized for future growth can make riding harder to control.
Measure the rider before comparing bikes
Measure your child’s height without shoes, standing straight against a wall. Then measure inseam from the floor to the crotch while the child stands with feet slightly apart. Record both measurements in inches or centimetres.
Height helps narrow the wheel-size range. Inseam helps with the individual stand-over and saddle check, but it does not convert automatically into a wheel size. Frame dimensions can differ even when two bicycles use the same wheel size, so measurements should lead to an in-person fit check whenever possible.
Use wheel size as the first filter
Start with the measured height rather than age. The overlapping ranges are intentional: children of the same height may differ in proportions, reach and riding confidence.
| Wheel size | Starting age | Rider height |
|---|---|---|
| 12 Inch | 3–4 | 34–40 in / 86–102 cm |
| 14 Inch | 3–6 | 37–45 in / 94–114 cm |
| 16 Inch | 4–7 | 40–48 in / 102–122 cm |
| 18 Inch | 5–9 | 43–52 in / 109–132 cm |
| 20 Inch | 7–12 | 48–60 in / 122–152 cm |
| 24 Inch | 10–14 | 54–64 in / 137–163 cm |
| 26 Inch | Youth and adults | Over 60 in / 153 cm |
If your child falls inside two ranges, compare both sizes instead of automatically choosing the larger one. Current confidence, body proportions and control should decide. If the measured height falls outside a product’s applicable starting range, choose another option rather than forcing the fit.
Check the actual fit and controls
Have the child try the bicycle. With the child standing over the frame, confirm there is comfortable clearance and no need to lean the bicycle sharply just to stand. Seated, the rider should reach the handlebar without stretching, locking the elbows or losing a stable posture.
Ask the child to hold the grips, operate the brakes and steer while remaining balanced. Brake controls must be reachable and usable by the child’s hands. A rider who cannot operate them confidently needs a different fit or setup, even if the height chart appears to match.
Do not use tiptoeing, an awkward reach or poor control as compromises for “room to grow.” The right bike is one the child can manage now. Follow the exact product manual for adjustment, assembly and maintenance details; where anything is unclear, use a qualified bicycle mechanic.
Compare the two supplied training-wheel options
The XJD Kids' Training Wheel Bike for Boys & Girls, 12/14/16 Inch – White offers 12 Inch, 14 Inch and 16 Inch SKU labels. The Girls' Training Wheel Bike by XJD, 12–20 Inch Wheels – Blue offers 12 Inch, 14 Inch, 16 Inch and 20 Inch labels. These catalog options help when the child needs a training-wheel bike and their measured height points toward one of those listed sizes; the second option also provides a 20 Inch comparison.
 XJD Kids' Training Wheel Bike for Boys & Girls, 12/14/16 Inch – White
Relevant for children whose measured height and individual fit support a 12 Inch, 14 Inch or 16 Inch training-wheel bike; confirm stand-over, reach and brake control.
 Girls' Training Wheel Bike by XJD, 12–20 Inch Wheels – Blue
A training-wheel option with 12 Inch, 14 Inch, 16 Inch and 20 Inch SKU labels. Use measured height to shortlist, then verify the child’s fit and control.
Neither supplied product lists an 18 Inch, 24 Inch or 26 Inch option. They are therefore not relevant when the child’s measured fit points to one of those sizes. A matching wheel label still does not prove fit: compare the child’s stand-over clearance, reach, brake access and control on the exact bicycle before deciding.
Include confidence in the decision
Training wheels may be relevant when they suit the child’s present learning needs and confidence. Do not select them solely because of age, and do not treat a product title as fit evidence. Both supplied models belong to the Training Wheel Bikes category, so families seeking a different bicycle format should compare other products.
During a supervised try, look for a relaxed posture, predictable steering and the ability to start, stop and use the brakes without panic or excessive assistance. If the child appears intimidated by the size or struggles with the controls, step back to a more manageable fit rather than expecting rapid adaptation.
Complete the choice safely
- Measure height and inseam.
- Shortlist wheel sizes from the XBikes height ranges.
- Have the child try each candidate and check stand-over, reach and brake control.
- Choose for present confidence, not future growth.
- Use a properly fitting bicycle helmet that sits level, with straps adjusted according to its manufacturer’s instructions.
Your next step is simple: take the two measurements, identify the overlapping wheel-size candidates, and let the child’s actual control decide which bike fits now.
Bikes for your next adventure
-
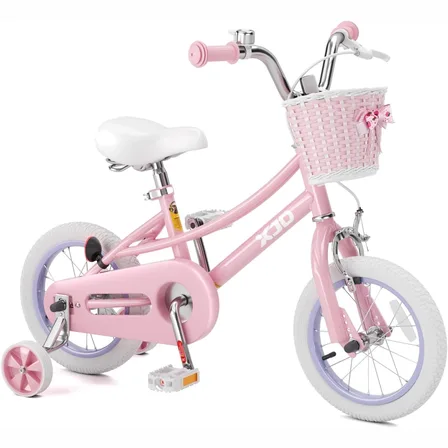
Pink 12/14/16/20" XJD Girls Bike with Training Wheels & Basket
The Pink XJD Girls Bike with Training Wheels & Basket is a first-bike pick f…$65.99
$75.99 -

Light Pink XJD Girls' Bicycle with Basket & Training Wheels
The Light Pink XJD Girls' Bicycle with Basket & Training Wheels is a retro-style…$109.99
$129.99 -

Black XJD Kids Bike for Boys – 12, 14 & 16 Inch Sizes
For a son between roughly 3 and 8 years old, the XJD Kids Bike in Black covers t…$169
$199